Showing posts with label Tricks. Show all posts

Friday, 20 July 2012

How To Hide Any Drive Through Command Prompt


Have you ever thought of hiding any drive from your system so that no one can knew about it. You may have heard or even used a lot of software’s that might be able to do that, but if you want to do things by your own without using any 3rd party software than this tutorial will show you how you can do it.
Well there are 3 ways of doing it, in this tutorial we are covering command prompt way of doing it.

Here is how to do it:

Step 1. Open command Prompt, go to Start Menu > All Programs >Accessories > Command prompt
Step 2. In the Command Prompt, type Diskpart and hit enter key. If UAC (User Account Control), dialog-box prompts than click Yes.
Step 3. Then type List Volume and press enter, this will produce the list of all drives.
Step 4. Now select the drive which you want to hide, you can either do this by typing Select Volume 1 (i.e. Volume Number) or by typing Select Volume C(i.e. Drive letter)
Step 5. To hide a drive, type Remove Letter C. Here, C is the drive letter than you want to hide. You can use any drive letter you want.
Step 6. That’s it. You are done! C drive is now hidden

How to unhide hidden drive

Step 1. Follow the procedure mentioned in step 1, 2, 3 and 4.
Step 2. To show the hidden drive type Assign Letter C and hit enter, now you can view C: drive in explorer.
That’s it. This is one way of hiding and un-hiding drives from explorer, for rest stay tuned.

How To Convert .docx To .doc Files


If you’re using the old version of microsoft office , then you probably have a problem with loading the . docx files . Here is brief tutorial that explains how to convert .docx to .doc files by using free service google docs .
1) Go to docs.google.com and log in your account, if you don’t have accout then create it for free .
2) Click on Upload -> Files…
3) Choose .doc file that you want to convert and click start upload
4) Open .docx file that you want to convert and click on File -> Download as ->Microsoft Word 97 -2003 (.doc)

Thursday, 19 July 2012

How To Recover Deleted Files For Free


In this post Im going to show you how to recover deleted files with Easeus Data Recovery Wizard Free Edition . It allows you to recover 1 GB data for free.
1) Download Easeus Data Recovery Wizard Free Edition from this LINK and install it on your PC
2) Launch Easeus Data Recovery Wizard and click on Deleted File Recovery
3)Select file types and Click Next
4) Select Partitions to scan Deleted Files and Click Next.
5) It will lists deleted files , select the file that you want to recover , (right click -> recover) .


Bypass 1 GB Limit :-)
Open regedit.exe :-)
Goto HKEY_LOCAL_MACHINE\SOFTWARE\DRWDemo :-)
Just delete DRWDemo Key :-)
Get Another 1 GB :-)

Saturday, 14 July 2012

Download Temple Run Brave Full Version For Android


Temple Run Brave4Temple Run has got more than 500,000 downloads for Android. It is the free version. But Temple Run Brave is the advanced version and hence paid too. You have to collect coins, and score by running, sliding, jumping and turning, but in this version we have a nice add-on. Temple Run Brave comes with a nice Archery feature in which you have to target and hit the bulls-eye on the go. This leads to earning of more coins and hence unlocking more powers.


Screenshots Showing Temple Run Brave Game Play

Temple Run Brave Screenshot 12
Temple Run Brave Screenshot 32
Temple Run Brave Screenshot 22


Click the images to see an enlarged view

A Trailer Of Temple Run Brave

Also See our Android Games GLU Pack
Download Temple Run Brave Full Version (Android)

Wednesday, 11 July 2012

How to Force Delete Locked Files Easily with LockHunter


Lock Hunter is a free tool that can delete blocked files which are not getting deleted in one go. It simply scans files and bring the exact conclusion to that thing and what the problem is so you simply have to right click and choose what is blocking that file.How to Force Delete Locked Files Easily with Lock Hunter
So download Lock Hunter from below according to your system if its 32 Bit choose that or choose 64 Bit one.

DOWNLOAD 32 BIT VERSION


DOWNLOAD 64 BIT VERSION

Making IDM full-version without patching.


I scrambled the internet to get a fine easy solution and I came across HOSTS File trick which will accept below serials and will not reject it.
So just check out the below trick on how to make IDM ( Internet Download Manager ) full version through HOSTS File Trick. The procedure is really easy to follow and you can make this happen just in few seconds.

Follow below steps :


1. Make sure you have installed the latest version of IDM if you do not have it you can download it from the official creators website.
2. Now after you have downloaded and installed the latest version just close the IDM and now go to start menu and make a search for Notepad.
3. Now right click on Notepad and than Run It As Administrator.
4. Now navigate to C: > Windows > System 32 > Drivers > etc. > Hosts.
5. When you are in the etc. folder you might not see any files their as you have click on show all files on the right hand side below.
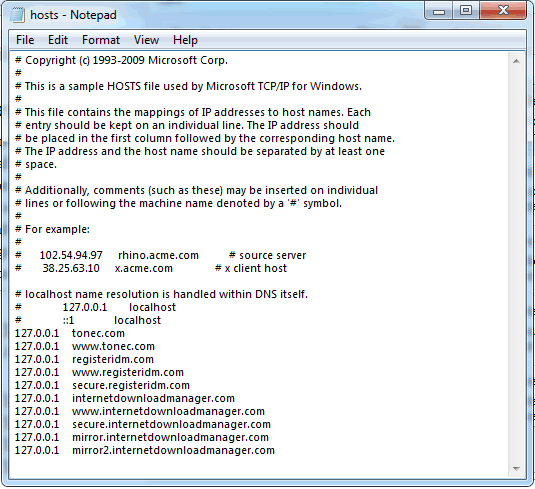
6. Now open the Hosts file and paste all the below lines like in the image.


127.0.0.1    tonec.com
127.0.0.1    www.tonec.com
127.0.0.1    registeridm.com
127.0.0.1    www.registeridm.com
127.0.0.1    secure.registeridm.com
127.0.0.1    internetdownloadmanager.com
127.0.0.1    www.internetdownloadmanager.com
127.0.0.1    secure.internetdownloadmanager.com
127.0.0.1    mirror.internetdownloadmanager.com
127.0.0.1    mirror2.internetdownloadmanager.com


Hosts File
7. So now as you can see in the above image how I have pasted all the lines @ the end of the Hosts file, you have to do same as above, now hit save.
8. Now when you have saved the HOSTS File you can simply enter any serials from below in your IDM Registration page.


RLDGN-OV9WU-5W589-6VZH1
HUDWE-UO689-6D27B-YM28M
UK3DV-E0MNW-MLQYX-GENA1
398ND-QNAGY-CMMZU-ZPI39
GZLJY-X50S3-0S20D-NFRF9
W3J5U-8U66N-D0B9M-54SLM
EC0Q6-QN7UH-5S3JB-YZMEK
UVQW0-X54FE-QW35Q-SNZF5
FJJTJ-J0FLF-QCVBK-A287M


9. Now enjoy your full version IDM without purchasing or patching its totally genuine and totally legal, you can update and it will still work like a charm so if you still have any queries than make sure to comment below.

Get Quality Backlinks for your Website Totally Free

Backlinks have a really important place when it comes to website reputation, if you have some good backlinks for your website than you will rank higher in search engines.

SiteValue Stats
Follow below steps :


2. Now you will a simple webpage like so insert your website like I have done in the below image.

3. Now after you have inserted your website simply click on Submit and do not close your window as it will process all the Backlinks right in front of your eyes.

4. So that’s it now enjoy free 300+ quality backlinks right for your website.

20 Awesome Google Tricks


1. Type “let it snow” and click on I’m Feeling Lucky. (awesome snow effect)
2. Type “google gravity” and click on I’m Feeling Lucky. (things start falling down)
3. Type “elggog” and click on I’m Feeling Lucky. (amazing mirror effect)
4. Type “do a barrel roll” and click on I’m Feeling Lucky. (a nice barrel roll attempted)
5. Type “who’s awesome” and click on I’m Feeling Lucky. (check it out yourself)
6. Type “tilt” and click on I’m Feeling Lucky. (webpage in 3D)
7. Type “who is the cutest” and click on I’m Feeling Lucky. (cute reviewed)
8. Type “google loco” and click on I’m Feeling Lucky. (someone starts moving)
9. Type “lol limewire” and click on I’m Feeling Lucky. (awesome picture)
10. Type “epic google” and click on I’m Feeling Lucky. (check it out yourself)
11. Type “rainbow google” and click on I’m Feeling Lucky. (check it out yourself)
12. Type “annoying google” and click on I’m Feeling Lucky. (check it out yourself)
13. Type “google pacman” and click on I’m Feeling Lucky. (check it out yourself)
14. Type “google heart page” and click on I’m Feeling Lucky. (check it out yourself)
15. Type “google magic” and click on I’m Feeling Lucky. (check it out yourself)
16. Type “google (color name)” and click on I’m Feeling Lucky. (check it out yourself)
17. Type “epic box” and click on I’m Feeling Lucky. (check it out yourself)
18. Type “sexy snape” and click on I’m Feeling Lucky. (check it out yourself)
19. Type “google sphere” and click on I’m Feeling Lucky. (check it out yourself)
20. Type “weenie google” and click on I’m Feeling Lucky. (check it out yourself)

So now pump these words into Google search and than click on I’m Feeling Lucky button and get amazed with awesome Google Tricks. Now you might get some problems as Google has updated their search page and now Instant search is on so make sure you turn that off by going to the Settings Gear icon and choosing Instant search off.

How to Bypass or Remove Survey from Any Website


bypass-surveyInternet is full of crappy websites providing you something you which to have with some limitations, many people upload content on survey generated websites which when passed you will get link to that file and they will earn money, but the real deal is that those websites simply does not work. Either they will say that survey is not completed or survey not available in your country. So we found an interesting survey bypassing or removing JavaScript which can do your job quit perfectly.

See Supported Websites and Get JavaScript Codes :


You can check out list of supported survey websites for which this JavaScript will work and now you just have to grab those JavaScript codes here and than when ever you visit any of the above listed survey website just copy any one JavaScript code and than paste it in your URL section and that’s it done.

Things you should be aware off :


You must have a JavaScript enabled and browser should be compatible, well now days every browser is compatible so make sure its updated. Now this may work or sometimes may not the real deal is that we haven't tried it yet and we are just providing you with the source code so try it out if you find any difficulties make sure to comment below.

Remove Write Protection on USB Drive & Memory Cards

write-protected-driveMany times using your portable devices you get errors like  the disk is write protected like in the image on the right hand side. So this can happen anytime due to virus attacks or anything can be the cause. There are two ways you can try to remove its write protection so check them below.
Firstly I will recommend checking for any physical lock on that card or USB, because many times company’s provide a lock write attached to the card for making it write protected, so check that up make sure its off and than also if you are not able to copy stuff to your card than follow below methods.

Removing Write Protection Using Registry Editor :


Well this is most preferred way of removing write protection as it does not include any formatting of disk or memory card. So you just have to manipulate a .reg key and that’s it.
1. Open Registry Editor by navigating to Star Menu > Run ( on windows 7 search for Run in start Menu ) now type “regedit” and you will see your Registry Editor opened.
2. Now Navigate to the following path :
HKEY_LOCAL_MACHINE\SYSTEM\CurrentControlSet\Control\StorageDevicePolicies
Now if you are not able to see the StorageDevicePolicies than no problem just download this.Reg File and double click on it, now restart your computer and you will have Storage DevicePolicies.
3. Now double click on the WriteProtect and make its value 0 and than click OK.
4. Now just close registry editor and restart your computer for changes to take effect, now plug your memory card or USB in and enjoy non write protected memory card.

Removing Write Protection Using Apacer Formatting Utility :


Now if you are not able to remove write protection from your Memory Cards or USB Drives using the above method than you can go for Apacer Formatting method which simply works quit good.
Now this method needs your card or USB Drive to be formatted so make sure that you have copied all the data from your USB Drive to your computer, now follow steps from below and have fun.
1. Download Apacer Formatting Utility to your computer, make sure its not kept inside the USB Drive just keep it anywhere outside where you can remember.
2. Now extract it and than plug your pen drive or memory card in to your computer and than double click on the Start.bat file present inside the folder you just downloaded. Now this step will start formatting your drive or card so let it do its work till you figure out that formatting is done.
3. Now try checking out if your card has been free from the write protection, well this will surely do its job and you can enjoy copying any files or folders to your drive.
So now these two methods will help you in fixing your USB Drive or Memory Card easily, but still if you are unable to remove write protection from your drive than their might be some hardware problem or something, make sure to contact your retailer and get it replaced.

How to Post Status Updates in Blue Color on Facebook


 today we are again back with another amazing trick for posting Blue text messages on Facebook wall or commenting with your message in Blue Color. Well so when ever person will click on the status he will be taken to his own profile. So just check out the steps below and have fun.


Steps for Posting Blue Status on Facebook :


1. Go to Facebook.com and Login with your Credentials.

2. Now go to update status link and paste below code, and change the text saying YOUR TEXT HERE with your own text you want in blue color like.

@[1: ]@@[1:[0:1: Your Text Here ]]

3. Now after you have done writing your text click on Post and Voila ! you will have your status in Blue Color which is dam ! awesome.


4. So isn’t this amazing trick to make text Blue in color so enjoy impressing your friends on Facebook and do share this trick if they ask you how its done.

Boost Torrent Speeds using UTorrent Turbo Booster


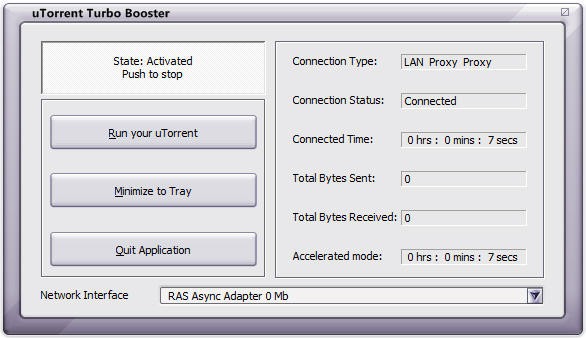
UTorrent Turbo Booster is a kind of plugin for the most popular p2p client called UTorrent which will improve speeds and functionality of your torrent application. Now this tool is designed for getting your speeds higher and making your downloads fast and much more stable by increasing seeds which are almost lost during the transaction. So now using this software you will be able to download your movies, songs and games at much higher speeds.
utorrent-turbo-booster


Download UTorrent Turbo Booster :

Well if you are really keen of getting this freeware utility for boosting your UTorrent downloads than you can download it from software informer website for free. You can also more in details about this software right on their website. So now have fun boosting your speeds and downloading awesome stuff.

How to Skip or Bypass Adf.ly - Adfoc and Linkbucks Links


Adf.ly, Adfoc and Linkbucks are the URL shorteners that pays you when people browse your shortened links, they do pay and they are not a scam but the paying ratio is not good its like 1000 views for $1 in India, hmm maybe it pays huge for other countries but well all the shortened links are really annoying because when ever you visit any website and you click on their links than you have to wait like 5 sec and than you click on the Skip Ad Button, well but now if you wanna skip them automatically than we have few good ways for this thing.


1. Using AdsFight! Userscript :

Well if you use Chrome or Firefox than the best way to skip or bypass these links is to install a simple userscript called "AdsFight!", it’s a simple one time install bypasser which automatically skips links as soon as you click on them.

Installing AdsFight! on Chrome : Well if you are on chrome you can just install AdsFight! userscript directly, just hit the Install Button and enjoy bypassing links.
Installing AdsFight! on Firefox : If you use Firefox for browsing activities than first you have to install the Greasemonkey Addon and than install the same AdsFight! Userscript.

2. Using DeadFly Online Bypasser Tool :

Deadfly URL
DeadFly URL is another online tool used for skipping or bypassing these shortened annoying links on the web. You just need to navigate to their website and paste the Adf.ly or Adcraft.co link and press Deadfly! boom you will be taken to the original source website.
So these were the two methods that can be used for this job, well I think so the above 1 method is the best one as it just needs one time installation and works simply automated. Well try them out and use the one which you feel confortable with.

Complete List of Run Commands for Easy Access in Windows


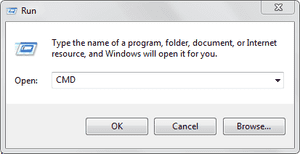
run-panel-cmdRun commands are really useful as it can open your services on the go by just inserting some key-words, well finding them manually from the control panel is a big headache, so we are bringing you some of the useful commands for the RUN Panel which will surely boost your work creativity.

A

Accessibility Controls - access.cpl
Accessibility Wizard - accwiz
Add Hardware Wizard - hdwwiz.cpl
Add/Remove Programs - appwiz.cpl
Administrative Tools - control admintools
Adobe Acrobat (if installed)- acrobat
Adobe Designer (if installed)- acrodist
Adobe Distiller (if installed)- acrodist
Adobe ImageReady (if installed)- imageready
Adobe Photoshop (if installed) - photoshop
Automatic Updates - wuaucpl.cpl

B

Bluetooth Transfer Wizard – fsquirt


C

Calculator - calc
Certificate Manager - certmgr.msc
Character Map - charmap
Check Disk Utility - chkdsk
Clipboard Viewer - clipbrd
Command Prompt - cmd
Component Services - dcomcnfg
Computer Management - compmgmt.msc
Control Panel – control


D

Date and Time Properties - timedate.cpl
DDE Shares - ddeshare
Device Manager - devmgmt.msc
Direct X Control Panel (If Installed)* - directx.cpl
Direct X Troubleshooter - dxdiag
Disk Cleanup Utility - cleanmgr
Disk Defragment - dfrg.msc
Disk Management - diskmgmt.msc
Disk Partition Manager - diskpart
Display Properties - control desktop
Display Properties - desk.cpl
Display Properties (w/Appearance Tab Preselected) - control color
Dr. Watson System Troubleshooting Utility - drwtsn32
Driver Verifier Utility – verifier


E

Event Viewer - eventvwr.msc


F

Files and Settings Transfer Tool - migwiz
File Signature Verification Tool - sigverif
Findfast - findfast.cpl
Firefox (if installed) - firefox
Folders Properties - control folders
Fonts - control fonts
Fonts Folder - fonts
Free Cell Card Game – freecell


G

Game Controllers - joy.cpl
Group Policy Editor (XP Prof) - gpedit.msc


H

Hearts Card Game - mshearts
Help and Support - helpctr
HyperTerminal – hypertrm


I

Iexpress Wizard - iexpress
Indexing Service - ciadv.msc
Internet Connection Wizard - icwconn1
Internet Explorer - iexplore
Internet Properties - inetcpl.cpl
Internet Setup Wizard - inetwiz
IP Configuration (Display Connection Configuration)- ipconfig /all
IP Configuration (Display DNS Cache Contents) - ipconfig /displaydns
IP Configuration (Delete DNS Cache Contents) - ipconfig /flushdns
IP Configuration (Release All Connections) - ipconfig /release
IP Configuration (Renew All Connections) - ipconfig /renew
IP Configuration (Refreshes DHCP & Re-Registers DNS) - ipconfig /registerdns
IP Configuration (Display DHCP Class ID) - ipconfig /showclassid
IP Configuration (Modifies DHCP Class ID)- ipconfig /setclassid


J

Java Control Panel (If Installed) - jpicpl32.cpl
Java Control Panel (If Installed) – javaws


K

Keyboard Properties - control keyboard


L

Local Security Settings - secpol.msc
Local Users and Groups - lusrmgr.msc
Logs You Out Of Windows – logoff


M

Malicious Software Removal Tool - mrt
Microsoft Access (if installed) - access.cpl
Microsoft Chat - winchat
Microsoft Excel (if installed) - excel
Microsoft Frontpage (if installed) - frontpg
Microsoft Movie Maker - moviemk
Microsoft Paint - mspaint
Microsoft Powerpoint (if installed) - powerpnt
Microsoft Word (if installed) - winword
Microsoft Syncronization Tool - mobsync
Minesweeper Game - winmine
Mouse Properties - control mouse
Mouse Properties - main.cpl


N

Nero (if installed) - nero
Netmeeting - conf
Network Connections - control netconnections
Network Connections- ncpa.cpl
Network Setup Wizard - netsetup.cpl
Notepad - notepad
Nview Desktop Manager (If Installed) - nvtuicpl.cpl


O

Object Packager – packager
ODBC Data Source Administrator - odbccp32.cpl
On Screen Keyboard - osk
Opens AC3 Filter (If Installed)- ac3filter.cpl
Outlook Express – msimn


P

Paint - pbrush
Password Properties - password.cpl
Performance Monitor - perfmon.msc
Performance Monitor - perfmon
Phone and Modem Options - telephon.cpl
Phone Dialer - dialer
Pinball Game - pinball
Power Configuration - powercfg.cpl
Printers and Faxes - control printers
Printers Folder - printers
Private Character Editor – eudcedit


Q

Quicktime (If Installed) - QuickTime.cpl
Quicktime Player (if installed) – quicktimeplayer


R

Real Player (if installed) - realplay
Regional Settings - intl.cpl
Registry Editor - regedit
Registry Editor - regedit32
Remote Access Phonebook - rasphone
Remote Desktop - mstsc
Removable Storage - ntmsmgr.msc
Removable Storage Operator Requests - ntmsoprq.msc
Resultant Set of Policy (XP Prof) - rsop.msc


S

Scanners and Cameras - sticpl.cpl
Scheduled Tasks - control schedtasks
Security Center - wscui.cpl
Services - services.msc
Shared Folders - fsmgmt.msc
Shuts Down Windows - shutdown
Sounds and Audio - mmsys.cpl
Spider Solitare Card Game - spider
SQL Client Configuration - cliconfg
System Configuration Editor - sysedit
System Configuration Utility - msconfig
System File Checker Utility (Scan Immediately) - sfc /scannow
System File Checker Utility (Scan Once At Next Boot)- sfc /scanonce
System File Checker Utility (Scan On Every Boot)- sfc /scanboot
System File Checker Utility (Return to Default Setting) - sfc /revert
System File Checker Utility (Purge File Cache) - sfc /purgecache
System File Checker Utility (Set Cache Size to size x) - sfc /cachesize=x
System Information - msinfo32
System Properties - sysdm.cpl


T

Task Manager - taskmgr
TCP Tester - tcptest
Telnet Client - telnet
Tweak UI (if installed) – tweakui


U

User Account Management - nusrmgr.cpl
Utility Manager – utilman


W

Windows Address Book - wab
Windows Address Book Import Utility - wabmig
Windows Backup Utility (if installed) - ntbackup
Windows Explorer - explorer
Windows Firewall - firewall.cpl
Windows Address Book - wab
Windows Address Book Import Utility - wabmig
Windows Backup Utility (if installed) - ntbackup
Windows Explorer - explorer
Windows Firewall - firewall.cpl
Windows Magnifier - magnify
Windows Management Infrastructure - wmimgmt.msc
Windows Media Player - wmplayer
Windows Messenger - msmsgs
Windows Picture Import Wizard (need camera connected) - wiaacmgr
Windows System Security Tool - syskey
Windows Update Launches - wupdmgr
Windows Version (to show which version of windows) - winver
Windows XP Tour Wizard - tourstart
Here ends the list of these useful commands, well hope that these commands really increase your productivity and hence fasten your work experience, enjoy and do share this post with all your friends.

How to Install Paid Android Applications For Free


Update : Many people commented that they see blank screen while using Applanet app, well I think so that will be fixed soon or else you can use BlackMart Alpha app for Android device which is similar to the Applanet app but works somewhat fine.
applanet app androidAndroid is one of the best OS available right now as its is owned and developed by Google. Now all the latest phones comes with this new OS preinstalled in them and its really awesome. You have many apps and games which you can play on your smart phone but the thing is that many good ones are paid, so to get those paid ones you have to link your debit card than pay them and than you can enjoy those games or you can simply install a simple app with which you can download those apps for free of cost.
Applanet is that small awesome application for Android devices with which you can download any apps or games those are paid for free. It is somewhat same like Installous app we have for iPhone which we install using Cydia.

How Applanet Works :

Applanet is a simple app for Android which simply provides with the paid apps and games for free which you can download right on phone. You simply download and install this app and than search - download - install any application from it for free. Its totally free of charge and simply takes few minutes to install.

How to Download & Use Applanet :

Now if you also want to install paid apps and games for free on your android device than simply Download Applanet App for your android phone and than copy it to your phone, now navigate to it through file manager or anything and click on it to install it.
Now simply navigate to this app from your application menu and fire it up, enjoy searching and downloading apps on the go. If you find this difficult and cannot make it up with it than comment below with your problem and hopefully I will solve it for you.

Activate Microsoft Office 2010 with EZ - Activator


Microsoft Office 2010 is the best office suit which any business person will need to take over his business, not only the business person but in todays generation teenagers also need Microsoft Word for their school projects. Well it might be used for anything but there’s always some limitation in good software's, so by limitations I mean that you have buy that software to use it. And if we go with the price many people are not satisfied with the price as they think its really expensive.
So we brought an easy Office Toolkit which will make your Microsoft Office 2010 full version really easily that called Office Toolkit 2010. This really easy to use and can be done without any technical knowledge so check all the steps below how to use this amazing toolkit.
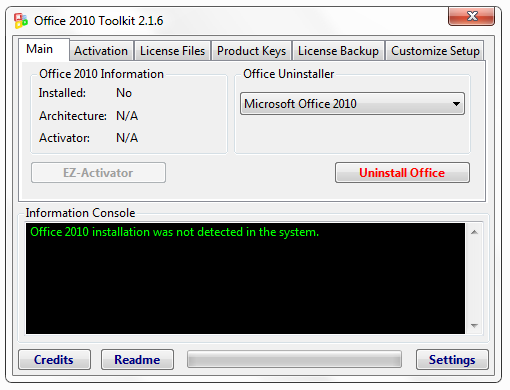
Office 2010 Tookit
So this is the Office Toolkit which you can use to easily activate your Microsoft Office 2010, well it has many options you can tweak according to your preference but we are going to use just one option to activate you Office. So its saying Office was not detected on your system that’s because I have not installed this on my PC but when you will install office it will not say that think so check below steps to see how it works.

How to Download and Use EZ-Activator :

2. Now you need to have Microsoft .NET Framework, if you do not have Google for it and download it out.
3. Now you have everything ready Office Installed and Toolkit downloaded now its time for some fun.
4. Run this Toolkit, it will ask for permission simply press YES and you will see above window opened.
5. Now you just have to Press EZ-Activator Button and it will start processing your request and make your Office full version. You will get message that your office is now full version enjoy.
So now you have made your Office 2010 Full Version and you can use all its feature for free and for unlimited time enjoy this best Office Suit and have fun :)

Thursday, 21 April 2011

My first Post

Hello Readers,
Its my first post in Blogger. Kindly wait for sometime when I'll start updating this blog daily with Astonishing Tricks and Tips for you.

This blog is under construction.