Saturday, 14 July 2012

Download Android GLU Games Pack Full – Android Games


Download Free Full Version Android games – the Android GLU Games Pack, that contains the finest games for Android . Some of the games are Deer Hunter , Call Of Duty, Mini Golf and Much More. See below for screenshots of all the games. Just download the games pack and install it into your Android phone and enjoy. Also download Temple Run Brave Full Version for Android.


Download Android GLU Games Pack (16 Games , 66 MB)

Want Windows Like App Quitting In Mac, Try RedQuits[Mac]


windows like app quitting mac4The red close button in your mac window title bar doesn’t actually quits the application, unlike Windows where the Close button quits the application and removes the files from memory. That’s the reason why Mac OS X users need to quit application from system menu bar or alternatively use command-Q hotkey combination. If you want to have Windows like application in your Mac then try RedQuits. It closes all the instances of the program in question and its open windows just by clicking the red button on the top-left of the window.


quit app.png2

It works on Mac OS X Snow Leopard and Lion.

Friday, 13 July 2012

Top 10 Ways to Speed Up Your Computer’s Boot Time


If there's one thing everyone dreads, it's rebooting their computer. It may only take a minute or two, but it can seem like forever. Here are our top 10 tweaks that'll make your computer boot a little faster.

This is a pretty controversial topic, as there are a lot of startup-tweaking myths out there. So, we took to the streets (of the internet) and searched for as many easy, well-supported tips as we could find. There may be others, some of which are controversial, but these 10 things are almost sure to get you a faster-booting machine.

10. Tweak Your BIOS

Top 10 Ways to Speed Up Your Computer's Boot TimeWhen you first set up your computer, your BIOS is set up to make things a bit more convenient for you, but once you're all set up, those things can be disabled. If you hold the DEL key when you start up your computer (or whatever key your BIOS tells you to enter setup), you can turn on the "Quick Boot" option and move your hard disk to the top of the boot priority list. The Quick Boot setting will turn off the tests your computer runs when it first turns on, and the boot priority tweak will tell your computernot to look for CDs, thumb drives, or other media when it first starts, which will get you booted into your OS quicker. If you ever need to boot from CD though, you'll have to go back into the BIOS and change this again before you do.

9. Clean Out Programs that Launch at Startup

Top 10 Ways to Speed Up Your Computer's Boot TimeOne of the most tried and true ways to speed up your boot process is to keep unnecessary programs from starting up with your computer. You can do this by runningmsconfig from the Start Menu's search box, and going to the Startup tab. This applications list will tell you what each of those applications does, so you know which ones you can disable and which ones you don't want to. Previously mentioned Solution is also a fantastic way to clean up these programs, and these days it's got a bunch of other handy features that make it worth a download.

8. Delay Windows Services That Run at Startup

Top 10 Ways to Speed Up Your Computer's Boot TimeMany people argue that disabling Services from msconfig will also speed up your boot time, but we've found that this is more problematic than anything. However, you can delay certain startup services so that your computer boots quickly and then worries about them later—after all, you don't need all those services the minute you start up your machine.

7. Change Your Boot Menu's Timeout Values

Top 10 Ways to Speed Up Your Computer's Boot TimeIf you're dual-booting your machine, then your boot menu probably has a "timeout value", meaning the amount of time it waits for you to make a selection before it just boots into the default OS. On Windows, this timeout value is often 30 seconds, which is a long time to wait if you aren't looking directly at your screen. To change this timeout value, head to msconfig and click on the BOOT.INI tab, and change the number in the timeout box to something lower. If you're dual-booting with Linux, you're probably running the GRUB boot menu, and you can change the timeout on that too.

6. Disable Unused Hardware

Top 10 Ways to Speed Up Your Computer's Boot TimeYour computer loads a lot of drivers when it first starts up, some of which you might not even use. Head into the Device Manager from the Start Menu's search box, and look for anything you aren't using—Bluetooth controllers, modems, and virtual Wi-Fi adapters are common culprits. Right-click on the entry you want to disable and hit "Disable". Remember to only do this with things you don't actually use—if you use Wireless Hosted Networks, you'll need to keep those virtual Wi-Fi adapters enabled. It's also worth mentioning here that keeping all your drivers up to date will help this portion of the startup time, too (which you can do with the help of a program like previously mentioned Device Doctor).

5. Keep Your Antivirus Running and Up to Date

Top 10 Ways to Speed Up Your Computer's Boot TimeThis should go without saying, but we'll say it anyway: install some antivirus software, keep it up to date, and run a regular scan. This is more of a preventative measure than an actual boot-speeding tip, but if you everdo get malware, it's sure to slow your computer's boot time. With a good antivirus around like Microsoft Security Essentials, you'll be more protected against that happening. Don't like MSE? There are somegreat ones out there too, so there's no reason not to have one around.

4. Remove Unnecessary Fonts

Top 10 Ways to Speed Up Your Computer's Boot TimeSince the dawn of time, Windows has loaded fonts at startup and slowed down the boot time. This is less of a problem than it used to be, but it can still slow you down a bit. Windows 7 loads over 200 fonts at startup; even more if you've installed Microsoft Office. Chances are, you use very few of those fonts, so you can hide them to speed up that process. In Windows 7, open up the Fonts folder from the Start Menu's search box, and check off all the fonts you don't need. Then click the "Hide" button in the toolbar. This way, if you ever want them, you can bring them back, but Windows won't load them at startup. Note that just removing a few fonts probably isn't going to make a noticeable difference—you'll probably need to get rid of a few hundred. That said, you might have hundreds more fonts installed than you realized, so that isn't as ridiculous as it sounds.

3. Upgrade Your RAM

Top 10 Ways to Speed Up Your Computer's Boot TimeInstalling more RAM has always been an effective way of speeding up your computer, and that hasn't changed. RAM is pretty cheap these days, so if you're running low, there's no reason not to stock up and make your computer run a little smoother. We've gone over how to replace it in both a desktop and a laptop, and even for the inexperienced, it's a pretty simple procedure.

2. Give Your Computer a Static IP

Top 10 Ways to Speed Up Your Computer's Boot TimeWhen you first start up your computer, it spends a significant amount of time asking the network for an IP address. You can get rid of this process altogether by giving your computer a static IP address that never changes. Not only does this make your network easier to manage (since each computer will always have the same IP address), but it can shave a bit more time off your startup. Here's how to do it in different versions of Windows.

1. Install a Solid State Drive

Top 10 Ways to Speed Up Your Computer's Boot TimeThese days, your hard drive is probably the biggest bottleneck in your machine. One of the best upgrades you can make to your computer is to install a solid state drive, which has super-fast read times that can speed up your startup considerably. They're certainly not a cheap upgrade, nor are they without their own maintenance requirements, but if you want to speed up your computer and its boot time, you can't go wrong by installing an SSD. The difference will be shocking.

Again, these aren't the only ways to shorten your computer's boot time, but they are some of the most well-known, trusted methods that we've found. If you have any of your own favorite tweaks, share them with us in the comments, but beware of myths and snake oil—there are a lot of tweaks out there that do more harm than good.

Thursday, 12 July 2012

Manual setting for all Indian networks

AIRTEL
AIRTEL LIVE
Account Name – Airtel live
Homepage – http://live.airtelworld.com
Username – Leave Blank
... Password – Leave Blank
Proxy – Yes
Server Adress (Proxy) – 100.1.200.99
Access Point – airtelfun.com
Server Port (Proxy) – 8080
Data bearer – GPRS (Packet Data)
Authentication Type – Normal
MOBILE OFFICE
Account Name – Airtel Mobile Office
Homepage – www.techvorm.com
Username – Leave Blank
Password – Leave Blank
Proxy – No
Access Point – airtelgprs.com
Server Port – 8080
Data bearer – GPRS/Packet Data
Authentication Type – Normal
AIRTEL NOP
Account Name – Airtel NOP
Homepage – www.techvorm.com
Username – Leave Blank
Password – Leave Blank
Proxy – Yes
Server Address (Proxy) – 100.1.200.99
Access Point – airtelwap.com
Server Port (Proxy) – 8080
Data bearer – GPRS/Packet Data
Authentication Type – Normal
AIRTEL MMS
Account Name – Airtel MMS
Server Address – http://100.1.201.171:10021/mmsc
Proxy Address – 100.1.201.172
Proxy Port – 8799
IDEA
IDEA GPRS
Account Name – Idea Internet
Username – Leave Blank
Password – Leave Blank
Homepage – http://wap.ideafresh.com
Server Port (Proxy) – 8080
Server adress (Proxy) – 10.4.42.45
Databearer – GPRS /Packetdata
Access Point – imis
Proxy – Yes
Authentication Type – Normal
VODAFONE
VODAFONE GPRS
Account Name – Vodafone GPRS
Homepage – http://live.vodafone.in
User Name – Leave Blank
Password – Leave Blank
Proxy – Yes
Proxy Address – 10.10.1.100
Proxy Port – 9401 (or 9201)
Data Bearer – Packet Data
Packet Data Access Point – portalnmms
Network type – IPV4 (Look for it in advanced settings)
Authentication – Normal
TATA DOCOMO
TATA DOCOMO DIVE IN
Account Name – Docom Dive
Username – Leave Blank
Password – Leave Blank
Homepage – http://divein.tatadocomo.com
Server Port (Proxy) – 8080
Server Address (Proxy) – 10.124.94.7
Databearer – GPRS /Packetdata
Access Point – tata.docomo.dive.in
Proxy – Yes
Authentication Type – Normal
DOCOMO INTERNET
Account Name – Docom Net
Username – Leave Blank
Password – Leave Blank
Homepage – www.techvorm.com
Proxy – No
Databearer – GPRS /Packetdata
Access Point – tata.docomo.internet
Proxy – Yes
Authentication Type – Normal
DOCOMO MMS
Account Name – Docomo MMS
Username – Leave Blank
Password – Leave Blank
Access Point- tata.docomo.mms
Homepage- http://mmsc/
Proxy – Yes
Server Address (Proxy) – 10.124.26.94
Port – 8799
Databearer – GPRS/Packetdata
Proxy – Yes
Authentication Type – Normal
RELIANCE
Reliance GSM WAP (GPRS)
APN – rcomwap
Login Request Required – off
Authentication – PAP
Data Compression – off
Header Compression – off
Settings Name – Mobile World
Home Page – http://wap.rworld.co.in
Proxy – Yes
Proxy Server Address – 010.239.221.005
Port – 8080
Username – Leave Blank
Password – Leave Blank
Reliance GSM RCOMNET
Account Name – RCOMNET
APN – rcomnet
Proxy – Leave Blank
DNS – Leave Blank
Username – Leave Blank
Password – Leave Blank
Reliance MMS
APN – rcommms
Login Request Required – off
Authentication – PAP
Data Compression – off
Header Compression – off
Settings Name – Reliance MMS
Proxy – Yes
Server Address (Proxy) – 10.239.221.5
Port – 8080
Username – Leave Blank
Password – Leave Blank
Server URL: http://10.239.221.47/mms/
AIRCEL
Aircel GPRS
Accont Name – Aircel GPRS
APN – aircelgprs
Homepage – www.techvorm.com
Proxy – Leave Blank
DNS – Leave Blank
Username – Leave Blank
Password – Leave Blank
Aircel Pocket Internet (WAP)
Account Name – Aircel WAP
APN – aircelwap
Homepage – www.techvorm.com
Proxy – Leave Blank
DNS – Leave Blank
Username – Leave Blank
Password – Leave Blank
BSNL
BSNL GPRS
APN – bsnllive
IP – 10.220.67.131
Port – 8080
Homepage – http://bsnllive.in
BSNL MMS
APN – bsnlmms
IP – 10.210.10.11
Port – 8080
Homepage – http://bsnlmmsc.in
BSNL Net
APN – bsnlnet
IP – Leave Blank
Port – Leave Blank
Homepage – http://www.techvorm.com
UNINOR
Uninor GPRS
Account Name – Uninor Gprs
Username – Leave Blank
Password – Leave Blank
Homepage – www.techvorm.com
Server Port (Port) – 8080
Server Address (Proxy) –10.58.10.58
Databearer – GPRS/Packetdata
Access Point – Uninor
Proxy – Yes
Authentication Type – Normal
VIDEOCON
Videocon GPRS
Connection Name – Videocon Internet
Data Bearer – Packet Data
APN – vinternet.com
Username – Leave Blank
Password – Leave Blank
Homepage – www.techvorm.com
Proxy server – Leave Blank
Proxy port – Leave Blank
Videocon WAP
Connection Name – Videocon WAP
Data Bearer – Packet Data
APN – vgprs.com
Username – Leave Blank
Password – Leave Blank
Homepage – http://wap.live.in
Proxy Server – 10.202.5.145
Proxy Port – 8799
Videocon MMS
Connection Name – Videocon MMS
Data Bearer – Packet Data
APN – vgprs.com
Username – Leave Blank
Password – Leave Blank
Homepage – http://10.202.4.119:10021/mmsc/
Proxy Server – 10.202.5.145
Proxy Port – 8799

Boot WinXp Fast

1. Open notepad.exe, type "del c:\windows\prefetch\ntosboot-*.* /q" (without the quotes) & save as "ntosboot.bat" in c:\
2. From the Start menu, select "Run..." & type "gpedit.msc".
3. Double click "Windows Settings" under "Computer Configuration" and double click again on "Shutdown" in the right window.
4. In the new window, click "add", "Browse",... locate your "ntosboot.bat" file & click "Open".
5. Click "OK", "Apply" & "OK" once again to exit.
6. From the Start menu, select "Run..." & type "devmgmt.msc".
7. Double click on "IDE ATA/ATAPI controllers"
8. Right click on "Primary IDE Channel" and select "Properties".
9. Select the "Advanced Settings" tab then on the device or 1 that doesn't have 'device type' greyed out select 'none' instead of 'autodetect' & click "OK".
10. Right click on "Secondary IDE channel", select "Properties" and repeat step 9.
11. Reboot your computer.

Wednesday, 11 July 2012

Boost Your Wi-Fi Signal Using an empty Beer Can

Boost Your Wi-Fi Signal Using a Beer CanSo internet is used by everyone and if you are @ home you will always want that your whole house is covered by Wi-Fi so that anytime, anywhere you can access it so internet speed is must @ long distance well now you can get some nice Wi-Fi Boosting using a simple and efficient Beer Can well I grabbed this amazing trick from Discovery Channel’s Website and I am posting it on my website.
Follow the below steps to boost your Wi-Fi Network :
Boost Your Wi-Fi Signal Using a Beer Can

Step 1.


Empty a Beer can obliviously after drinking that and than you have to make sure that its washed thoroughly so that there is no smell or anything left by that liquid Beer, because if anything's is left than it will be a problem and smell will be there in your whole room.

Boost Your Wi-Fi Signal Using a Beer Can

Step 2.


Now after washing that Beer Can thoroughly you have to remove that small can opening piece you can see that in the image on the right hand side.


Step 3.


Boost Your Wi-Fi Signal Using a Beer CanNow after you have removed the small can opening piece you can to cut the can in the round diameter like in the image on the right hand side, we are doing this because we have to open that can and make a shape like small antenna.


Step 4.


Boost Your Wi-Fi Signal Using a Beer CanSo now you have to repeat the same step on the other corner but this time you have to leave small space between the cuts so that the can remains attached to the bottom and we will have a look of antenna for our modem - router for boosting purpose. So remember this step is really important to follow else your antenna will not look like how it should be.
Boost Your Wi-Fi Signal Using a Beer Can

Step 5.


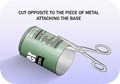
So now the main steps are completed, now you have to cut the can vertically from between like in the image on the right hand side. and your antenna will take looks like how it should be and now you only have to attach this antenna to your modem so that we can se its effect.

Boost Your Wi-Fi Signal Using a Beer Can

Step 6.


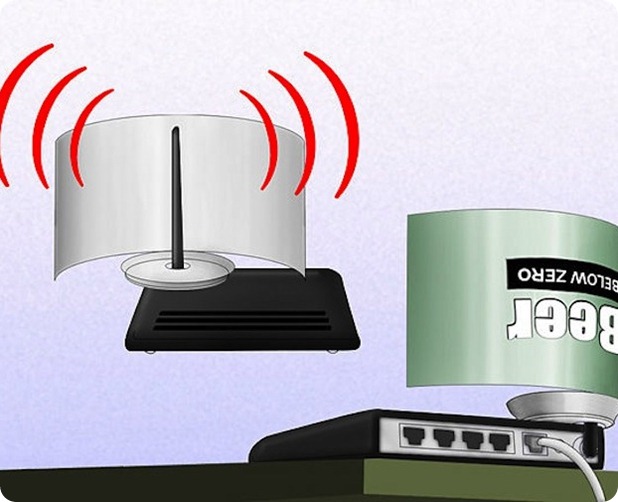
Now last step is too attach this antenna to your modem - router, you can use any adhesive or M-Seal which has really a good hold, so in this step you can change directions of your antenna suiting your will, like in which direction you want it too boost the signal.


Step 7.


Now your antenna is ready for boosting purpose and it will look something like below you can check the image below.
Boost Your Wi-Fi Signal Using a Beer Can
[ Image Credits and Source : Discovery.com ]

Boost PC Performance for High End Gaming Experience


Boost PC Performance for Hign End Gaming ExperienceGBoost is a free Windows Application which helps you to boost your PC Performance for ultimate Gaming Experience. GBoost simply turns off some unwanted services which free up RAM for unleashing game experience.
So Boosting process is really simple you simply have to press the Boost button which you can see in the right hand side image, and after your game has completed your can simply press the Restore to get everything in the normal more.
So enjoy games without any restriction and any jerk and play safe game really easily. This is freeware utility so you do not need to buy this or it does not have any time restriction so you can use it and share it with all your friends.
So have fun using this amazing utility and make your gaming experience much more fun and frolic.


DOWNLOAD GBOOST